


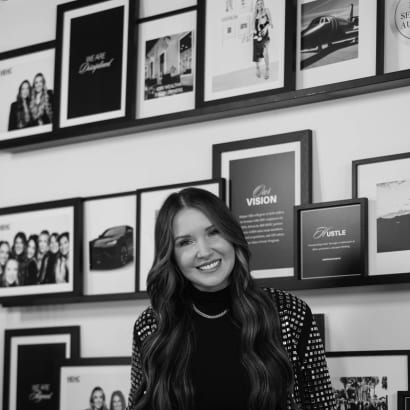
Meet the Founder of Harper Ellis Hair Co., Terra Harvell
A stylist who felt she needed to build what she couldn't find in other hair extensions, in five years Terra Harvell has grown Harper Ellis into a $10 million business.
by Anne Moratto
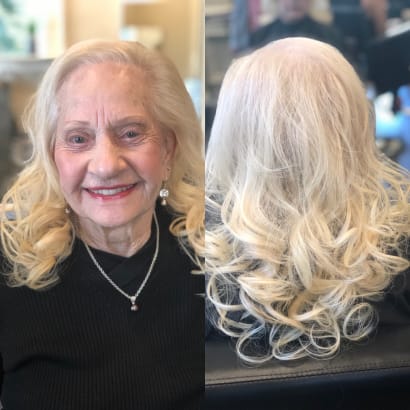
Blonding specialist Kim Bruce, @themisfitblonde, uses extensions from Hotheads to give her clients the hair of their dreams.
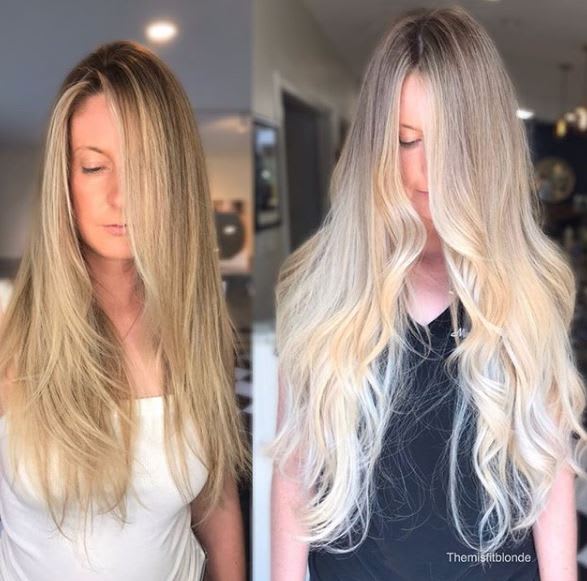
For this mermaid hair transformation, Bruce used two packs of color 60 in 22-24 inches and one pack of color 60 in 18-20 inches.
@themisfitblonde
This hair is what dreams are made of. Blonding specialist Kim Bruce knows a thing or two about creating swoon-worthy hair. The Massachusetts-based stylist shares her stunning transformations on her @themisfitblonde Instagram page, which has more than 100,000 followers fawning over her work.
When a recent client came to Bruce looking to achieve her dream hair, Bruce turned to Hotheads Extensions to make an impact. The result? Total mermaid hair.
Manufactured with high-quality, human remy hair with the cuticle intact, Hotheads Extensions can be reapplied up to three times, while still looking and feeling amazing. Clients will get 8 to 10 weeks of wear from each application.
"Hotheads extensions blend so well," Bruce says. "I'm able to give my clients the hair of their dreams quickly and know the quality will still be there when they come in to have them moved up."
In this video, Bruce demos her application process:
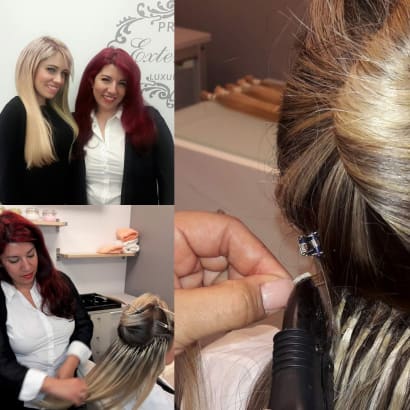
Prepping for Extensions:
Bruce began this look by toning her client's ends for 5 minutes on damp hair using this formula: Kadus Professional 10CeV & 10p 7 vol. She then shampooed and applied a deep conditioner before puting her client under a hooded dryer for 15 minutes. While her client was under the dryer, Bruce gave the extensions from Hotheads a “purple bath” by filling the shampoo bowl with water and adding a few squirts of purple shampoo. She then dipped the extentions in the bath a few times to tone them to a more icy blonde. Once her client and the extensions were both 100% dried, she began her application.
For this look, Bruce used two packs of 22-24 inch in color 60 and one pack of 18-20 inches in color 60.
Extension Application:
Starting an inch above the hairline, Bruce applied a row of two, sandwiching two of her 22-24".
About an inch above that, she applied a row of three, sandwiching two 22-24” together.
About another inch above that she applied a row of four, sandwiching together two 22-24”.
Right below the occipital bone is where Bruce began her fourth row. She applied a row of five sandwiching together a 18-20” on top of a 22-24” for rows four and five.
For her sixth row she applied a row of four sandwiching together two 18-20”. PRO TIP: This helps blend in her natural hair and creates a soft layered look. Make sure to stay a good inch below her whirl on top of her head so the extensions won't show through.
On the sides, she started an inch from the hairline (above and to the side) so the client can put her hair up or tuck it behind her ear without extensions showing. She applied a row of two 22-24” sandwiched together.
Above that she applied a single 22-24” sandwich and bricklayed between the two below it. Above the single she applied a row of two, sandwiching a 18-20” over a 22-24”.
She next repeated the same pattern on the other side.
When she was done, she used my remaining 18-20” (3 sandwiches) to fill in any area that needed more hair.
She razored her front angle to blend in her natural hair to the extension hair.
Finished by curling with 1 1/4" marcel iron and a light-hold hairspray.
A stylist who felt she needed to build what she couldn't find in other hair extensions, in five years Terra Harvell has grown Harper Ellis into a $10 million business.
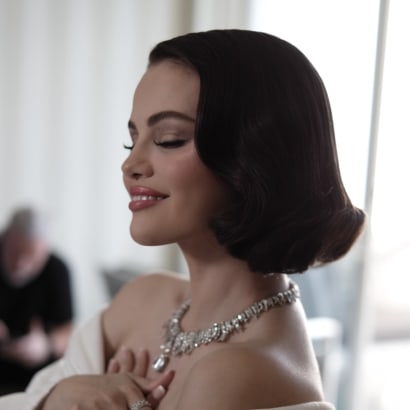
Celebrity hairstylist Renato Campora graced Selena Gomez with a timeless and elegant Hollywood bob for the 2025 Golden Globes, using Great Lengths Tape-In Extensions.
Celebrity hairstylist Marc Mena shares exclusively with MODERN how he used the new Essenza and Aria Great Lengths Tape-Ins to style Karla Sofía Gascón for the 2025 Golden Globes.

Christina Aguilera made a surprise performance at the Sabrina Carpenter concert, showing up with new length. Here's how to recreate the look.
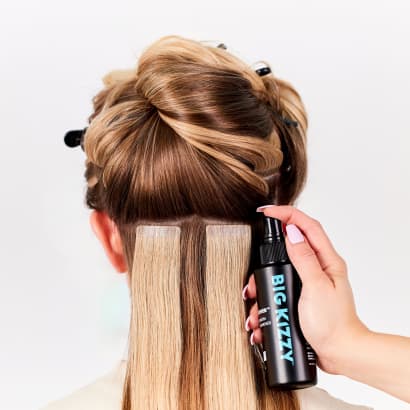
Meet Big Kizzy, known for their 3-step tape in hair extension remover system. Founded by an extension hair pro, they now offer everything for extensions!
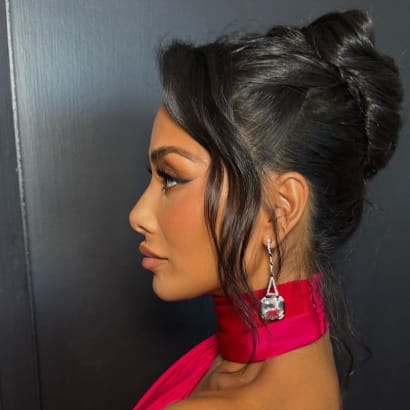
Celebrity Nicole Scherzinger's soft updo was created by celebrity hairstylist Dimitris Giannetos, using new The Coveted Tape hair extensions by Covet & Mane.
More than a Dream is a new collection of 5 styles from Hairdreams, a collaboration with Lorenzo Marchelle.
Celebrity stylist Gregory Russell shares how he created Riley Keough's 2024 Emmys hair look with some added length.
This client grew up being told how unattractive her hair was and felt like there was nothing that would change that. This stylist did--and with love.
If you are prepared with the right techniques, the right questions, and the right products, you will be ready to create a beautiful result for your hair extension client. And when you've done that, you have a client for life. Here are my proven methods for building a solid hair extension career and business.
Expand your service offerings with solutions for clients experiencing hair loss.
In this exclusive video interview, Great Lengths educator Kristina Noto explains how to use the brand's extension offerings for clients with hair loss.
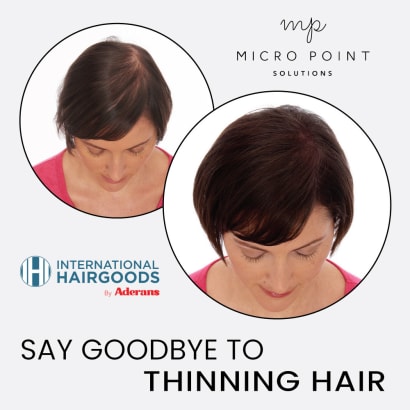
For clients who want to address volume on the top of their heads, but don't want the commitment of wearing and caring for a topper, this unique service provides a solution. Micro Point Links fill in thinning areas by knotting individual hairs onto existing hairs. It's a service that is a win-win, offering clients an answer to sparse, bare areas and providing stylists with a valuable addition to their service menu.
Celebrity stylist Andrew Fitzsimons leads the creative direction for BELLAMI's new Visual Identity campaign.
INH has just launched the professional side of their extension business, created by the pros, for the pros.
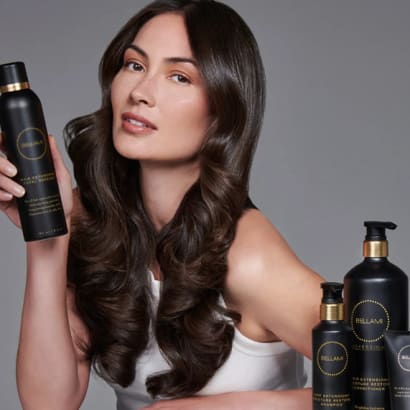
Bellami's new professional-grade hair extension care collection for in-salon and at-home use is designed to double the lifetime of hair extensions.
When Sacha Quarles wasn't able to offer extension services to his celebrity clients, he decided to stop paying someone else to do them and to learn how to do them, himself. And the result has been career-changing.